Showing posts with label tutorial. Show all posts

Monday, February 8, 2021

How to Paint Medieval Quilted Armor

 I have always struggled with achieving depth and cleanliness when painting Byzantine quilted armor. I found a quick and easy approach that I thought I'd share. 


Basecoat the quilted portion with flat black. Or even use a heavy wash. 


Drybrush the quilted armor portions with flat white. Aim for about 95% coverage. 


Make a wash. Most illustrations of Byzantine armor is in different shades of teal. I make a spectrum of this by blending green/white at one end, blue/white at the other, and washing the two together on my palette.


Apply the wash to the drybrushed areas. I like to use the color variation mentioned above to add some interest to different figures or different parts of the armor. 


I never imagined I would use a technique involving a black basecoat and drybrushing, but do what it takes, I guess! 


Thanks for looking. 

Sunday, January 10, 2021

How I Paint M81 Camo

 M81 is a pretty ubiquitous camo pattern, and has been used almost everywhere in the world by every imaginable faction in the past few decades. Even today it is popular with special forces and paramilitary. 

I have what I think is a pretty good method of getting consistent results, so I thought I'd share it (and preserve it as a reference fir myself). 

As always, I am mixing colors to get the tones I want. 

I think the key to getting the correct look is to always keep the colors cool by adding blue paint. The green should tend towards the blue/gray end of the spectrum. The tan should be just slightly blue as well. Finally, the brown should be closer to purple. 

Most modelers start with a green basecoat for M81, but this is wrong for two reasons. Looking closely you will see that the green is not the main color, and is instead integrated with the brown and beige in approximately equal portions. Secondly green is a dark tone, and will make the subsequent colors dark. This is why I follow a beige, brown, green process. 

So here is the step-by-step tutorial:

I basecoat the figure with flat white.


I then paint it overall in a beige color. This is a mix of tan, green, and blue, 


Next I paint in about 1/3 of the figure with brown spots. This should tend towards purple - mine is a mix of brown, red, and blue. 


I then paint in green. The green I used here is actually just a bit too green. I would tone it down just a little further with blue and tan. I also paint the ALICE webbing with the same color. 


Next, to tone everything down and unify the colors, I paint on a wash of flat tan. 


Then I paint on the black shapes. Keep these thin and use many branches. 


Finally, I highlight the webbing, and cut in the details with very thin black paint. 


Here are some results from previous blog posts. 


I hope this has been helpful. 

Tuesday, December 20, 2016

Painting Satisfactory Multicam

Multicam seems to be the new camouflage pattern of the US Army as well as of the special forces of most major nations. It's clearly not going away any time soon, so I figured it was time to master painting it.

Even this guy's got some Multicam! 

Representing this pattern in miniature presents several problems. First of all, the striking thing about this camo is probably the black and white squiggly lines. This has caused me to jump the gun and over represent this component in the past leading to a cartoony look which detracts from the rest of the paint job.

The second problem is that different pictures tend to give completely different impressions of what the camo should look like. I think that this is primarily the result of camera filters, but of course material aging and environment are important factors. For example, the first image below shows highly faded multicam while the second illustrates a cleaner look in which the camo is dominated by the green and white tones. The second photo is also obviously enhanced.


I decided to go for something in between these two extremes in which the base colors are well blended and faded, but the green and white dominate just a little.

This paint job is a 10-step process for me, but I think that some corners could be cut to save a little time while still giving an OK result.

The figure I used to illustrate this is a 15mm Australian from Eureka Miniatures. Here he is primed in Vallejo white primer. Unfortunately I cannot give exact color codes for the paints I use, as I tend to mix colors and use multiple manufacturers to get the exact right shade. I will post a color card at the end of this though for you to see the relative tones I used.


Next I added a thin coat of greenish tan.


I added green "splotches" after that was dry. It is important that this green, and the brown that follows, is thinned to the extent that it is almost a wash. This blends it with the base color just as in the real life version of Multicam.


After these layers were fully dry, I added the infamous white dots and dashes:


And their dark gray counterparts:


These were followed by a black wash. I made the wash by thinning Vallejo black paint and adding a touch of dish detergent to help it settle in the cracks.


Once the wash was dry, I drybrushed the fig with a khaki color and highlighted the most raised details with thinned Vallejo "bonewhite." The result of these two steps is below:


If you want heavily weathered Multicam, you can finish here with a pinwash and call it a day. I wanted to add a little more definition though, so I added a few more layers.

I continued by adding a few small, thin green patches:


Followed by another set of white dots and dashes:


And a black pin wash to bring out the fine raised details:


And here is the promised color card showing the relative tones:


The nice thing about this process is that it is easily reproducible. This is a problem I had in the past in which each batch I painted looked a little different. Here is a US Army fireteam I recently painted using this process:


A post of the complete platoon will follow eventually. 

Thanks for looking!

Thursday, December 13, 2012

Tutorial for Torvic on the O-GPK

or whoever else wants it!

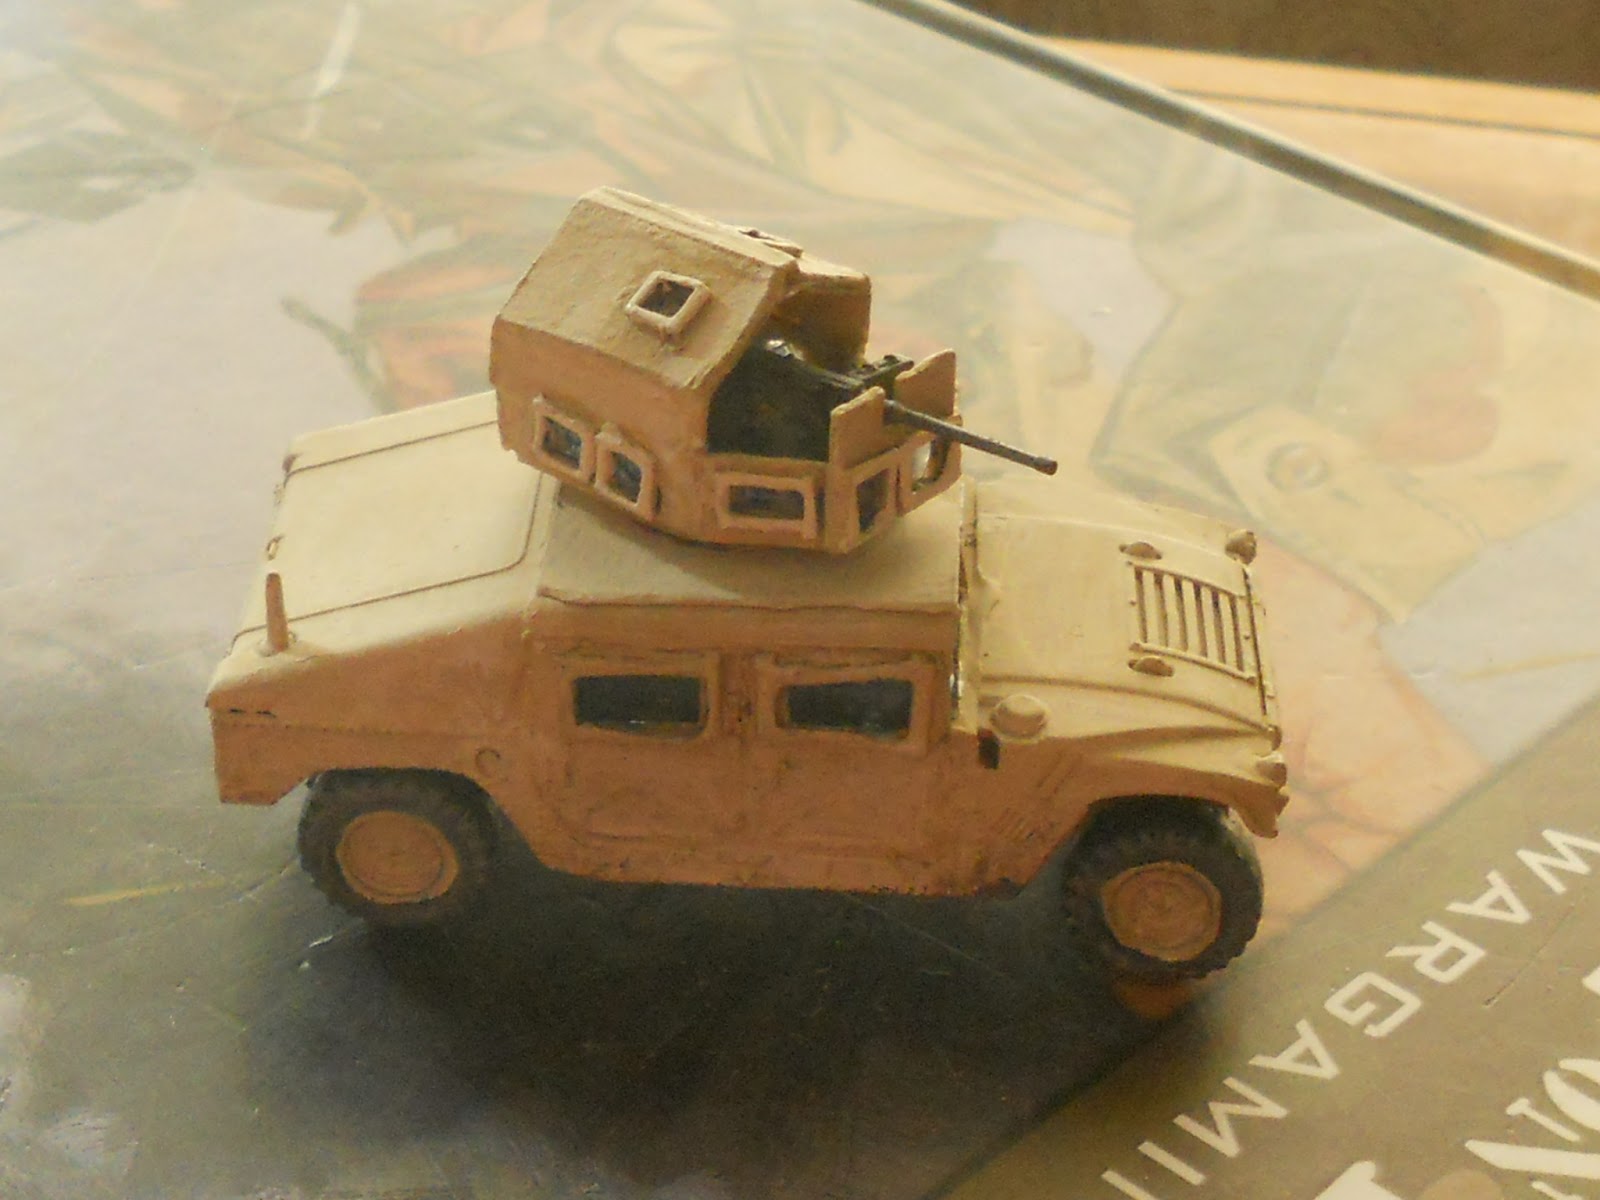
By using this as a guide, you will hopefully be able to copy my project and have a HMMWV turret for your games. This will cover materials needed, the actual building process, and some tips.

You will need some thin card, I use cereal or cracker boxes; some good super glue, my favorite "Loctite" gel which comes in the blue and silver squeeze bottle; thin clear plastic sheet, mine was from a name card holder; and of course the regular stuff for measuring and cutting. Something optional is a clear gel gloss glue, mine is "glossy accents," some artsy craftsy stuff in a pink bottle; I use it for filling in the armored windows.

The main steps are preparation,  building the floor, building the walls, adding the details, then the optional roof armor which is a bit tricky.

a) Preparation.
i) take the turret ring and trim either the TOW control box, or machine gun mounts off of it. You want a completely flat surface.

b) Building the floor
i) cut out a section of cardboard approximately 15mm wide, by 20mm long.
ii) trim off the two front corners about 5mm from the end to make the end a triangle, as in picture 1.
picture 1
iii) place a generous amount of gel super glue around the top of the flattened turret ring from step "a," and center the floor assembly on as in picture 2.
Optional) once the glue is very dry, you may want to cut a circle in the floor for putting the figure through. I left the one with the roof closed, and cut the crewman in half, but it is more noticeable on the roofless version.

c) Building the walls
picture 2
i) cut strips of the card into rectangle shapes for the walls. Mine were 5-6mm tall. Cut enough to go around the back, the two sides, and the two small pieces on the front triangle part.
ii) cut window holes where you want them on the sides and front. I built the six window version here. Use a picture for size and placement of the windows.
iii) super glue them in place, then cut some of the clear plastic sheet to fit behind them in the inside of the turret walls.

d) Adding the details.
i) cut four strips of card per window  for building up the armored frames. The best way of doing this is by your own eye judgement; you want a nice tight fit all around the cut out window.
picture 3
ii) glue these in place with your super glue. They are very fiddly to work with so I suggest picking them up with a knife blade, you will end up with a frame like that of the roof window in picture 3.
iii) to build the gunner shield use picture 4 as a guide


following just the steps above, you will have a nice turret with no roof like this, and this. If you want to continue with the roof assembly which is very tricky to get correct, please follow the guide below. This will cover the steps of the actual assembly.
picture 4

a) The roof assembly
i) begin by cutting out a piece from the clear plastic using picture 5 as a guide. As seen in picture 3, the turret roof will only be as long as the wall up to the bend. Mine was a total of about 26-27mm wide, you will have to eyeball yours for the best fit though.
ii) now assuming you follow the measurements above, scribe with a blade at the 5mm, the middle [~13mm], and the 21mm sections.
iii) bend each scribe and test fit. Make any adjustments needed. Once you are done, super glue each end to the top of the wall.
picture 5
iv) cut strips using the same type of paper card you used before, so that they fit both sides, and both top sides. Make a small square cut on the two top pieces using picture 3 as a guide, and glue each one to the outside of the clear plastic roof.
v) frame in the two windows in as you did with the others.
vi) there will probably be a gap between the roof and the walls, so cut a piece of regular printer paper and fit it over the gap on the sides as in picture 3. (you could also use some type of filler putty or clay to fill the gaps. There will also be a gap on the peak of the roof, cover that with a strip of the paper card as well as in picture 1.

With that you should have a decent roof assembly for your turret. Just remember that step is optional, so if it didn't work out, don't worry about it because it is very difficult to get the measurements correct.

Working with these materials pose a few tricky problems, but nothing big. These include flimsy paper that shreds and sometimes holds a weak bond, and the fact that the super glue fogs clear plastic.

I have worked with this type of paper card for years mostly with making buildings and wargame bases, as well as conversions like these. These are made like chipboard, having many layers of very thin paper, these will sometimes disintegrate especially when cut with a dull knife, sanded, or rubbed. I cure this with a large dose of wood glue. I painted it on all the edges, window frames, and super glue bonds. This also adds another element of strength, as well as helping the paint go on better.

For some reason super glue, or CA, fogs up clear plastic with this horrid white powder as you probably know. I didn't worry too much about that with this project because the windows are so small, and because I used the clear gel I mentioned earlier. This stuff goes on in a gel, and dries with in a very hard, extremely glossy finish, I think it gives a good impression of armored glass even when the original layer is fogged. If you don't have access to this stuff, I would white glue the clear plastic on, instead of CA.

Anyway, I hope this helped anyone who was interested, especially Torvic who requested a tutorial. Good luck to all, and if anyone attempts this, please share your results with me! If you have any questions just comment.


Friday, November 30, 2012

M1151 with O-GPK

This is one of the latest HMMWVs to be made for the U.S. Armed forces. Now, anyone who is intgerested in modern wargaming in 20mm will know right away that no kit is made of this in plastic at least. I believe there is a Dragon kit with the AC system and other updated features, but the only ones of them I can find are in Australia for an outrageous price.

So what did I do to have this you may ask, conversion is the answer! This has been a somewhat involved project lasting a few evenings and most of yesterday afternoon.
I took the basic Revell TOW Hmmwv, and shaved off the "x" shaped armor on the doors. I then added a plastic sheep to the roof of the truck to represent the extra armor there. But, in the preoces of the last step, I smashed up the windscreen and frame. This was an extra step which worked out well because the front windscreen is more heavily armored than in the kit.

Next up was the Objective Gunner Protection Kit, or (O-GPK). This is an extra armored little turret on top of the truck with a heavier weapon on it. I built this specific model with a roof on it which is just one of tha many options and variations with HMMWV turrets.

I made these with the original TOW turret ring (with the controls and all shaved off) with a card floor on it, like the below picture.

Next up were the walls. These are somewhat thin steel plates with very thick, framed bulletproof windows. decided that I would make the walls from the same card I used earlier, then cut window slots in that then add the clear sheet plastic after it was solid. This resulted in the part seen below the white bit of paper in the picture below.
Next up was the roof part of the turret.  I used a little different method here. I cut the entire assembly out of the clear sheet of plastic, cut out windows from strips of card, then  glued the steel plates on in strips. Oh, I also made an optional, gunner shield on the front. I made this with the same method described above.

Here are some pictures of different angles. Note, I sill had not framed the windows in on the sides.


A test fit.


I then painted the entire model in Khaki with the usual highlights etc.


Hope you like.